There are two ways to register and login user in Laravel.
- By using Laravel Authentication
- By making our own Login and Registration files using Laravel MVC structure.
-
By using Laravel Authentication
Step 1: Create your project using this command:
composer create-project --prefer-dist laravel/laravel project-nameStep 2: Run these commands on the terminal:
composer require laravel/ui

php artisan ui vue --auth

npm install && npm run dev
Step 3: Create a database and set the database configurations inside .env file and
inside config > database.php.
.env file:
DB_DATABASE=auth

DB_USERNAME=root

DB_PASSWORD=password
config>database.php:

Step 4: Run the following command in terminal:
php artisan migrate
You are all set to register the user and login. -
By making our own Login and Registration Files using Laravel MVC Structure
As we know Laravel follows MVC structure, i.e. Model View Controller Structure.
VIEW: View contains HTML part of our application and separates our application logic from presentation logic.
CONTROLLER: In Controller, all our logical and business logical part is defined. The controller contains request handling logic within a single function. From view Part, our data is sent to the controller and from the controller, we send our data to Model to save it to the database.
MODEL: Model is a class that represents the logical structure and relationship of the underlying data table. In Laravel, each database table has a corresponding Model that allows us to interact with that table. The model gives us the way to retrieve, insert, update, and delete information from the data table.
You need to create a Laravel Project first by using this command.
composer create-project --prefer-dist laravel/laravel project-nameSTEP 1: CREATE VIEW PAGES FOR REGISTRATION AND LOGIN
Create view pages for Registration Page and Login Page.
views>registration.blade.php
views>login.blade.phpWe can also create a layout file in which we can write common code that can be used all over the application. We can extend the layout file code by extending the file in other view files by using directives.
@extends('layout')layout.blade.php:
<html>

<head>

<title>Restaurant Website

</title>

<style>

.content{

background-image:linear-gradient(to right,#C9D6FF,#E2E2E2);

height:600px;

}

</style>

<link rel="stylesheet" href="https://maxcdn.bootstrapcdn.com/bootstrap/4.0.0/css/bootstrap.min.css" integrity="sha384-Gn5384xqQ1aoWXA+058RXPxPg6fy4IWvTNh0E263XmFcJlSAwiGgFAW/dAiS6JXm" crossorigin="anonymous">

<script src="https://code.jquery.com/jquery-3.2.1.slim.min.js" integrity="sha384-KJ3o2DKtIkvYIK3UENzmM7KCkRr/rE9/Qpg6aAZGJwFDMVNA/GpGFF93hXpG5KkN" crossorigin="anonymous"></script>

<script src="https://cdnjs.cloudflare.com/ajax/libs/popper.js/1.12.9/umd/popper.min.js" integrity="sha384-ApNbgh9B+Y1QKtv3Rn7W3mgPxhU9K/ScQsAP7hUibX39j7fakFPskvXusvfa0b4Q" crossorigin="anonymous"></script>

<script src="https://maxcdn.bootstrapcdn.com/bootstrap/4.0.0/js/bootstrap.min.js" integrity="sha384-JZR6Spejh4U02d8jOt6vLEHfe/JQGiRRSQQxSfFWpi1MquVdAyjUar5+76PVCmYl" crossorigin="anonymous"></script>

</head>

<body>

<header>

<nav class="navbar navbar-expand-lg navbar-light" style="background:#D76D77">

<a class="navbar-brand" href="/">RESTO</a>

<button class="navbar-toggler" type="button" data-toggle="collapse" data-target="#navbarNavAltMarkup" aria-controls="navbarNavAltMarkup" aria-expanded="false" aria-label="Toggle navigation">

<span class="navbar-toggler-icon"></span>

</button>

<div class="collapse navbar-collapse" id="navbarNavAltMarkup">

<div class="navbar-nav">

@if(Session::get('user'))

<a class="nav-item nav-link" href="/list">List</a>

<a class="nav-item nav-link" href="/add">Add</a>

@endif

<</div>

<div class="navbar-nav ml-auto">

@if(Session::get('user'))

<a class="nav-item nav-link" href="#">Welcome, {{Session::get('user')}}</a>

<a class="nav-item nav-link" href="/logout">Logout</a>

@else

<a class="nav-item nav-link active" href="/login">Login</a>

<a class="nav-item nav-link active" href="/register">Register</a>

@endif

</div>

</div>

</nav>

</header>

<div class="content d-flex justify-content-center">

@yield('content')

</div>

<footer class="container"></footer>

</body>

</html>
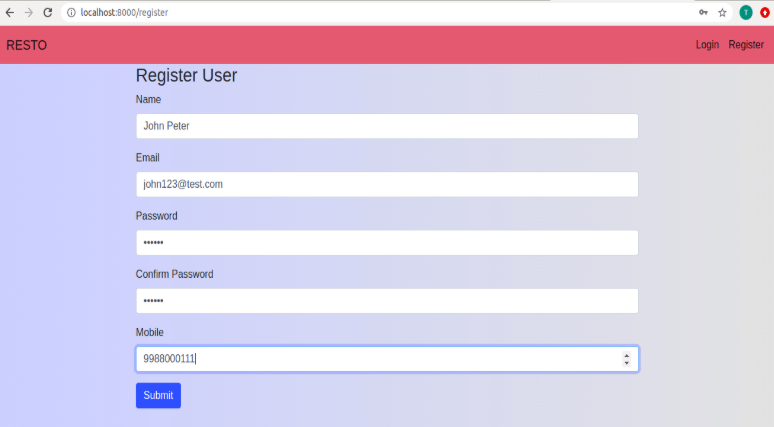
registration.blade.php:
@extends('layout')@section(‘content’)
<div class=”col-sm-8″>
<h3>Register User</h3>
@if(Session::get(‘register_status’))
<div class=”alert alert-success alert-dismissible fade show” role=”alert”>
{{Session::get(‘register_status’)}}
<button type=”button” class=”close” data-dismiss=”alert” aria-label=”Close”>
<span aria-hidden=”true”>×</span>
</button>
</div>
@endif
<form action=”registerUser” method=”post” return=”false”>
<div class=”form-group”>
<label>Name
<input type=”text” name=”name” value=”{{ old(‘name’) }}” class=”form-control” placeholder=”Enter Name” required>
</div>
@error(‘name’)
<div class=”alert alert-danger”>{{ $message }}</div>
@enderror
@csrf
<div class=”form-group”>
<label>Email
<input type=”text” name=”email” value=”{{ old(’email’) }}” class=”form-control” placeholder=”Enter Email” required>
</div>
@error(’email’)
<div class=”alert alert-danger”>{{ $message }}</div>
@enderror
<div class=”form-group”>
<label>Password
<input type=”password” name=”password” value=”{{ old(‘password’) }}” class=”form-control” placeholder=”Enter Password” required>
</div>
@error(‘password’)
<div class=”alert alert-danger”>{{ $message }}</div>
@enderror
<div class=”form-group”>
<label>Confirm Password
<input type=”password” name=”confirm_password” value=”{{ old(‘confirm_password’) }}” class=”form-control” placeholder=”Confirm Password” required>
</div>
@error(‘confirm_password’)
<div class=”alert alert-danger”>{{ $message }}</div>
@enderror
<div class=”form-group”>
<label>Mobile</label>
<input type=”number” name=”mobile” value=”{{ old(‘mobile’) }}” class=”form-control” placeholder=”Enter Mobile Number” required>
</div>
@error(‘mobile’)
<div class=”alert alert-danger”>{{ $message }}</div>
@enderror
<button type=”submit” class=”btn btn-primary”>Submit</button>
</form>
</div>
@endsectionlogin.blade.php:
@extends('layout')@section(‘content’)
<div class=”col-sm-8″>
<h3>Login User</h3>
@if(Session::get(‘error’))
<div class=”alert alert-danger alert-dismissible fade show” role=”alert”>
{{Session::get(‘error’)}}
<button type=”button” class=”close” data-dismiss=”alert” aria-label=”Close”>
<span aria-hidden=”true”>×</span>
</button>
</div>
@endif
<form action=”loginUser” method=”post”>
@csrf
<div class=”form-group”>
<label>Email</label>
<input type=”email” name=”email” value=”{{ old(’email’) }}” class=”form-control” placeholder=”Enter Email” required>
</div>
@error(’email’)
<div class=”alert alert-danger”>{{ $message }}</div>
@enderror
<div class=”form-group”>
<label>Password</label>
<input type=”password” name=”password” class=”form-control” placeholder=”Enter Password” required>
</div>
@error(‘password’)
<div class=”alert alert-danger”>{{ $message }}</div>
@enderror
<button type=”submit” class=”btn btn-primary”>Submit</button>
</form>
</div>
@endsectionSTEP 2: CREATE ROUTES FOR VIEW FILES:
To access the Registration and Login view files, we need to create routes in web.php file. Open routes > web.php
Route::view('register','register');

Route::view('login','login');
STEP 3: CREATE CONTROLLER:
We need to create a Controller to handle our form data. From View Files, When we submit our form data, it goes to Controller. We can make the controller by using the following command:
Php artisan make:controller RestoControllerYou will find your controller under App > http > Controller > RestoController
STEP 4: CREATE ROUTES FOR CONTROLLER:
Set routes for controller in web.php
Route::post('registerUser','RestoController@registerUser');

Route::post('loginUser','RestoController@login');
Create the functions registerUser() and login() to handle the data. For Example, function registerUser() will handle registration data. In this function, we will validate the user’s data and then pass that data to the data table to store it in the database using Model. So we need to create a Model for that particular data table in which we want to store our user’s data.
STEP 5: CREATE MODEL:
We can create a model by using the following command:
Php artisan make:model UserThe table name should always be in plural and the corresponding model name should be singular. Import Model in your Controller. After Validating, Send your data to the data table using Model.
REGISTER:
- You need to save your password in encrypted form. We can not save passwords directly into data tables as submitted by Users.
$encrypted_password = crypt::encrypt($data['password']); - If User is registered successfully, Set a flash session with a message that User has been registered successfully and redirect to the same page. But if there is an error, then show that error message on view Page. We use flash sessions for this because they get expired once the page is refreshed.
$req->session()->flash('register_status','User has been registered successfully');

return redirect('/register'); - The one important thing we need to check is that the email id using which once a user has been registered should never be able to register again with the same email Id.
function registerUser(Request $req){

$validateData = $req->validate([

'name' => 'required|regex:/^[a-z A-Z]+$/u',

'email' => 'required|email',

'password' => 'required|min:6|max:12',

'confirm_password' => 'required|same:password',

'mobile' => 'numeric|required|digits:10'

]);
->where(’email’,$req->input(’email’))
->get();
print_r($res);
$data = $req->input();
$user = new User;
$user->name = $data[‘name’];
$user->email = $data[’email’];
$encrypted_password = crypt::encrypt($data[‘password’]);
$user->password = $encrypted_password;
$user->mobile = $data[‘mobile’];
$user->save();
$req->session()->flash(‘register_status’,’User has been registered successfully’);
return redirect(‘/register’);
}
else{
$req->session()->flash(‘register_status’,’This Email already exists.’);
return redirect(‘/register’);
}
}
LOGIN:
- After done with the Registration, We can log in. Login will also follow the same process.
- If the user logins with the email id which has been registered, he will be logged in successfully and be able to access the Home route and some other routes.
- While login, we will check whether this email id is existing in our data table or not, If not then we will tell the user to register first using flash sessions. And if email Id exists, we need to match the password. But how will we match the password?
Because the user while login is giving us a simple password. But the one which we saved during registration is an encrypted password. So how will we match it? - We can match it. We need to get the encrypted password of the corresponding email id from the data table and need to decrypt it using the decrypt function of crypt class. After decrypting, We can match both the passwords. If password matches, User can be logged in otherwise show Password Mismatch Error.
function login(Request $req){

$validatedData = $req->validate([

'email' => 'required|email',

'password' => 'required'

]);
->where(’email’,$req->input(’email’))
->get();$res = json_decode($result,true);
print_r($res);if(sizeof($res)==0){
$req->session()->flash(‘error’,’Email Id does not exist. Please register yourself first’);
echo “Email Id Does not Exist.”;
return redirect(‘login’);
}
else{
echo “Hello”;
$encrypted_password = $result[0]->password;
$decrypted_password = crypt::decrypt($encrypted_password);
if($decrypted_password==$req->input(‘password’)){
echo “You are logged in Successfully”;
$req->session()->put(‘user’,$result[0]->name);
return redirect(‘/’);
}
else{
$req->session()->flash(‘error’,’Password Incorrect!!!’);
echo “Email Id Does not Exist.”;
return redirect(‘login’);
}
}
}
NOTE:
Now one more important thing to take care of authenticity is that User should not be able to access routes directly from the browser without being logged in.
For that, we can use Middleware.STEP 6: MIDDLEWARE
php artisan make:middleware customAuthApp > http > middleware > customAuth
In this Middleware, We can set some conditions that if the session is not set which means if the user is not logged in, he should not be able to access the home route. If he tries to access it, he should be redirected to the login page.
<?phpnamespace App\Http\Middleware;
use Closure;
use Session;class customAuth
{
/**
* Handle an incoming request.
*
* @param \Illuminate\Http\Request $request
* @param \Closure $next
* @return mixed
*/
public function handle($request, Closure $next)
{
$path = $request->path();
if($path==”login” && Session::get(‘user’)){
return redirect(‘/’);
}
else if(($path!=”login” && !Session::get(‘user’)) && ($path!=”register” && !Session::get(‘user’))){
return redirect(‘/login’);
}
return $next($request);
}
}Register Your Middleware:
App > http > kernel.php
In this kernel.php, We can add our middleware in any middleware(i.e. Global, grouped, or Individual) and can name it. Now we will use that middleware name that we have set in Kernel.php on routes. I have added customAuth middleware as customAuth in middlewareGroups.
protected $middlewareGroups = [

'web' => [

\App\Http\Middleware\EncryptCookies::class,

\Illuminate\Cookie\Middleware\AddQueuedCookiesToResponse::class,

\Illuminate\Session\Middleware\StartSession::class,

// \Illuminate\Session\Middleware\AuthenticateSession::class,

\Illuminate\View\Middleware\ShareErrorsFromSession::class,

\App\Http\Middleware\VerifyCsrfToken::class,

\Illuminate\Routing\Middleware\SubstituteBindings::class,

],
‘api’ => [
‘throttle:60,1’,
\Illuminate\Routing\Middleware\SubstituteBindings::class,
],‘customAuth’ => [
\App\Http\Middleware\customAuth::class
] ];Apply Middleware:
Apply the middleware on the routes you want to apply in web.php file.Web.php:
Route::group(['middleware'=>'customAuth'],function(){

Route::get('/list','RestoController@list');

Route::view('/add','add');

Route::post('addResto','RestoController@addResto');

Route::view('register','register');

Route::view('login','login');

Route::get('logout','RestoController@logout');

}); - You need to save your password in encrypted form. We can not save passwords directly into data tables as submitted by Users.
This will restrict unauthorized users to access the home page, list page, etc. Only authenticated users will be able to access those pages. And if once the user logged in, he would not be able to access the login and register page.
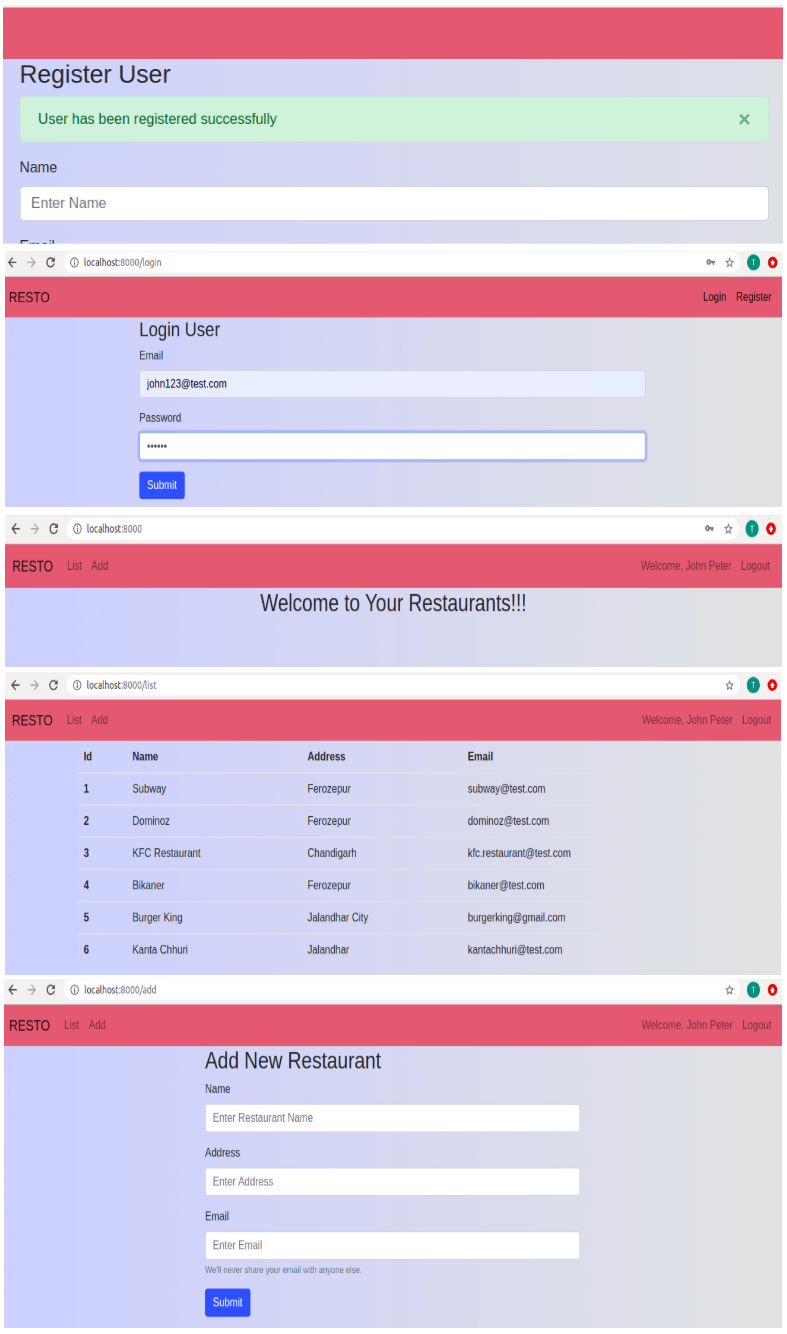
SCREENSHOTS:
Once the user is logged in, he will be able to access all the routes like home, add, list, etc. But if the user is not logged in, he would not be able to access add and list routes. He will be redirected to the login page as he needs to login first.
If you have skills in PHP programming and you want to enhance your career in this field, a PHP certification from StudySection can help you reach your desired goals. Both beginner level and expert level PHP certification exams are offered by StudySection along with other programming certification exams.


