

Introduction
When building React applications, managing data becomes difficult as the application grows.
At the beginning, passing data using props works fine. But when multiple components need the same data, the code can become messy and difficult to maintain.
Redux helps us manage shared application state in a centralized and predictable way.
In simple words:
Redux stores the application data in one central place called the store.
It simplifies state management and makes the application cleaner and more scalable.
Need of Redux (Avoid Prop Drilling)
In React, data is usually passed from parent component to child component using props.
Example:
App → Dashboard → Sidebar → UserProfile
Suppose the UserProfile component needs user data.
Without Redux, we may need to pass props through multiple components even when intermediate components do not use that data.
This problem is called:
Prop Drilling
Prop drilling makes:
- Code difficult to maintain
- Components tightly coupled
- Debugging harder
Redux solves this problem by storing shared data in a global store.
Any component can directly access the required data without passing props manually.
React Redux Architecture
Redux follows a simple one-way data flow.
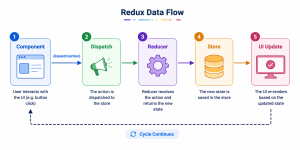
Explanation
1. Component
User interacts with the UI.
2. Dispatch
Component sends an action using dispatch.
Example:
dispatch(increment())
3. Reducer
Reducer updates the state based on the action.
4. Store
Store keeps the updated application state.
5. UI Update
Components automatically receive updated data using useSelector().
Recommended Folder Structure
A simple Redux Toolkit folder structure:
src/
├── redux/
│ ├── store.js
│ └── counterSlice.js
│
├── components/
│ └── Counter.jsx
│
├── App.jsx
└── main.jsx
Folder Explanation
| File | Purpose |
| store.js | Creates Redux store |
| counterSlice.js | Contains state, reducers, and actions |
| Counter.jsx | React component using Redux |
| main.jsx | Connects Redux with React using Provider |
Redux Example using useDispatch and useSelector
Step 1: Install Redux Toolkit
npm install @reduxjs/toolkit react–redux
Step 2: Create counterSlice.js
import { createSlice } from “@reduxjs/toolkit”; const counterSlice = createSlice({
name: “counter”,
initialState: {
count: 0,
},
reducers: {
increment: (state) => {
state.count += 1;
},
decrement: (state) => {
state.count -= 1;
},
},
});
export const { increment, decrement } = counterSlice.actions;
export default counterSlice.reducer;
Step 3: Create store.js
import { configureStore } from ‘@reduxjs/toolkit’ import counterReducer from ‘./counterSlice’
export const store = configureStore({
reducer: {
counter: counterReducer,
},
})
Step 4: Connect Redux with React
main.jsx
import React from ‘react’import ReactDOM from ‘react-dom/client’
import App from ‘./App’
import { Provider } from ‘react-redux’
import { store } from ‘./redux/store’
ReactDOM.createRoot(document.getElementById(‘root’)).render(
<Provider store={store}>
<App />
</Provider>
)
Step 5: Use useDispatch and useSelector
Counter.jsx
import { useDispatch, useSelector } from ‘react-redux’import { increment, decrement } from ‘../redux/counterSlice’
function Counter() {
const count = useSelector((state) => state.counter.count)
const dispatch = useDispatch()
return (
<div>
<h1>{count}</h1>
<button onClick={() => dispatch(increment())}>
Increment
</button>
<button onClick={() => dispatch(decrement())}>
Decrement
</button>
</div>
)
}
export default Counter
Understanding useSelector
useSelector() is used to fetch state data from Redux.
Example:
const count = useSelector((state) => state.counter.count)
Understanding useDispatch
useDispatch() is used to send actions to Redux.
Example:
dispatch(increment())
This updates the state inside the Redux store.
Conclusion
Redux helps us manage shared data in React applications more efficiently.
Redux Toolkit simplifies Redux and makes it beginner friendly.
The combination of:
- useSelector()
- useDispatch()
- createSlice()
- configureStore()
makes Redux much easier compared to older Redux patterns.


