SQLite3 is a native Plugin for React local for both Android (classic and local), iOS, and windows. Foundation of this library is primarily based on Chris Brody’s Cordova SQLite plugin.
Features:
- iOS and Android supported via identical JavaScript API.
- Android in pure Java and Native modes
- SQL transactions
- JavaScript interface via plain callbacks or Promises.
- Pre-populated SQLite database import from software bundle and sandbox
The library has been examined with React 16.2 (and earlier) and XCode 7,8,9 – it works well out of the container with no need of code adjustments. For XCode 7,8 vs. XCode 6, the most effective distinction is that SQLite ios library call suffix is tbd in place of dylib.
Version 3.2 is the primary version well-matched with RN 0.40.
Installation:
npm install --save react-native-sqlite-storage
Then observe the commands in your platform to link react-native-sqlite-garage into your mission
Ios:
Preferred technique
** React native 0.60 and above ** Run cd ios && pod install && cd … Linking is not required in React local 0.60 and above
** React native 0.59 and underneath **
Step 1. set up Dependencies
With CocoaPods:
Upload this in your Podfile which must be placed in the ios assignment subdirectory
pod 'React', :path => '../node_modules/react-native'

pod 'react-native-sqlite-storage', :path => '../node_modules/react-native-sqlite-storage'
Or use the pattern Podfile blanketed within the package deal by means of copying it over to the ios subdirectory and changing AwesomeProject internal of it with the call of your RN assignment.
Refresh the Pods set up
pod install
OR
pod update
Achieved, bypass to Step 2.
Without CocoaPods:
This command has to be achieved inside the root directory of your RN mission
react-native link
rnpm and xcode are dependencies of this mission and need to get mounted with the module but in case of any difficulty in configuring rnpm hyperlink and rnpm/xcode aren’t already mounted you can attempt to install it globally as follows:
npm -g install rnpm xcode
After linking project should like this:
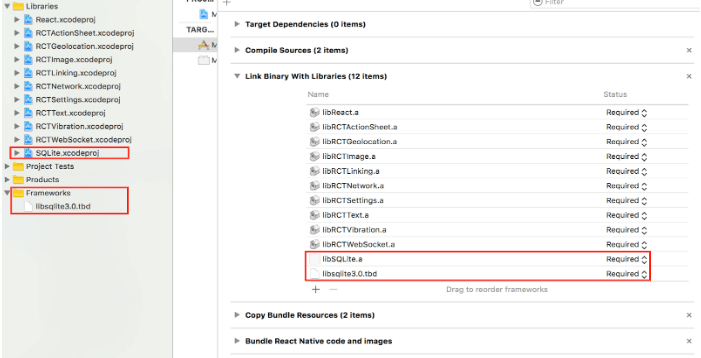
Step 1a. If rnpm link does not work for you you can try manually linking according to the instructions below:
Drag the SQLite Xcode project as a dependency project into your React Native XCode project
XCode SQLite libraries dependency set up
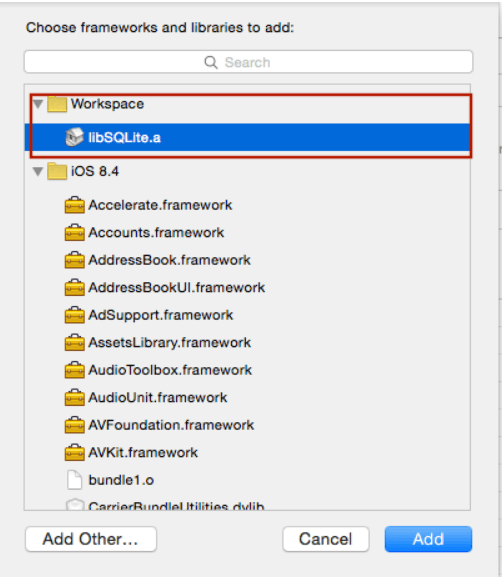
Add libSQLite.a (from Workspace area) to the specified Libraries and Frameworks. also add sqlite3.zero.tbd (XCode 7) or libsqlite3.0.dylib (XCode 6 and earlier) inside the identical style the usage of Required Libraries view (Do now not simply add them manually because the construct paths will now not be properly set)
Step 2. Application JavaScript require
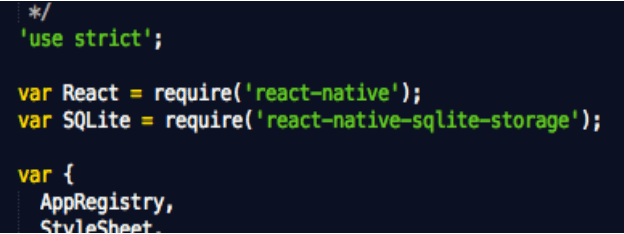
Add var SQLite = require(‘react-native-sqlite-storage’) to your index.ios.js
Step 3. Write application JavaScript code using the SQLite plugin
Add JS application code to use SQLite API in your index.ios.js etc. Here is some sample code. For a fully working example see test/index.ios.callback.js. Please note that Promise based API is now maintained as well with full examples in the working React Native app under test/index.ios.promise.js
errorCB(err) {

  console.log("SQL Error: " + err);

},

successCB() {

  console.log("SQL executed fine");

},

openCB() {

  console.log("Database OPENED");

},

var db = SQLite.openDatabase("test.db", "1.0", "Test Database", 200000, openCB, errorCB);

db.transaction((tx) => {

  tx.executeSql('SELECT * FROM Employees a, Departments b WHERE a.department = b.department_id', [], (tx, results) => {

      console.log("Query completed");

      // Get rows with Web SQL Database spec compliance.

      var len = results.rows.length;

      for (let i = 0; i < len; i++) {
        let row = results.rows.item(i);
        console.log(`Employee name: ${row.name}, Dept Name: ${row.deptName}`);
      }
      // Alternatively, you can use the non-standard raw method.
      /*
        let rows = results.rows.raw(); // shallow copy of rows Array
        rows.map(row => console.log(`Employee name: ${row.name}, Dept Name: ${row.deptName}`));

      */

    });

});
Setting up your project to import a pre-populated SQLite database from software for iOS
- Step 1 – Create ‘www’ folder.
Create a folder called ‘www’ (yes have to be known as exactly that else things won’t paintings) in the mission folder through Finder - Step 2 – Create the database document
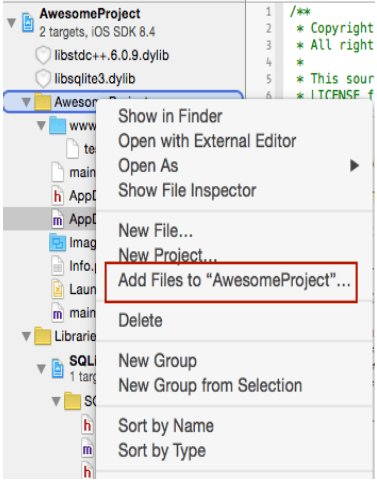
replica/paste your pre-populated database report into the ‘www’ folder. give it an identical name you’ll use in openDatabase call to your software - Step 3 – add a document to a task
in XCode, right-click on the main folder and pick out upload files to ‘your task name’
- Step 4 – pick out files to add
in the add files conversation, navigate to the ‘www’ listing you created in Step 1, choose it, ensure you take a look at the option to Create Folder Reference
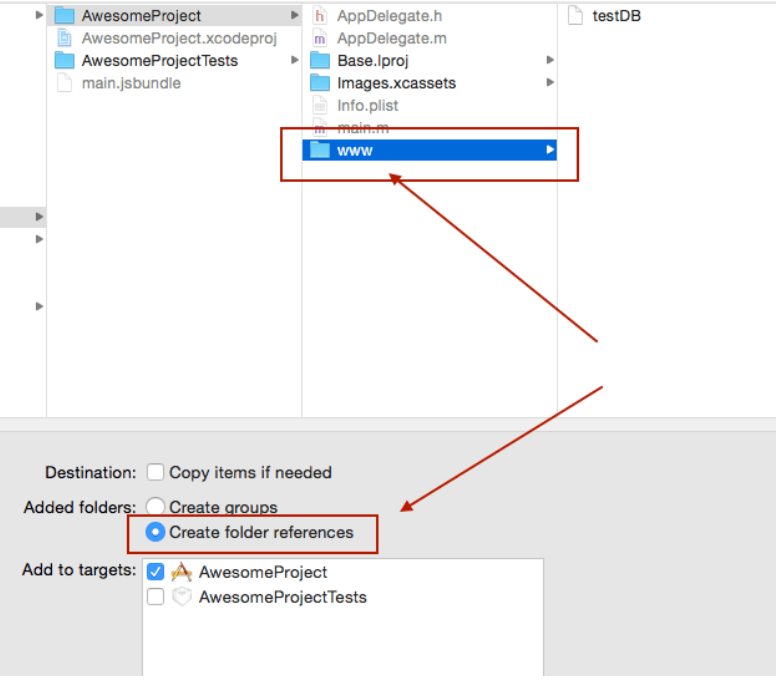
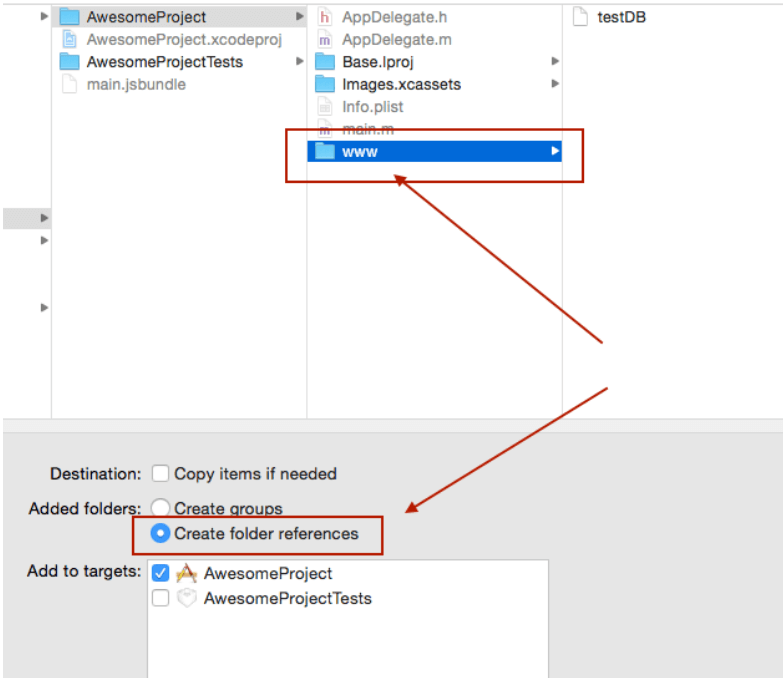
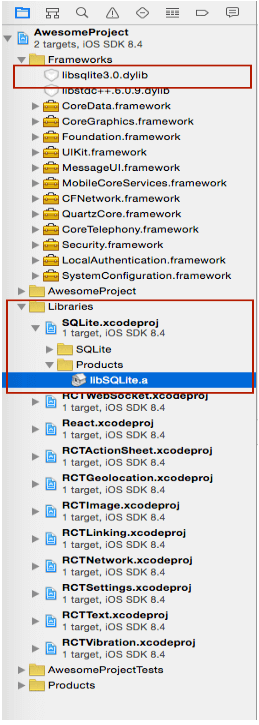
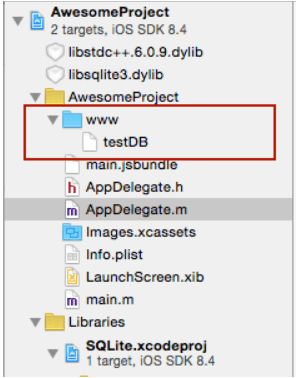
- Step 5 – Verify project structure
ensure your project structure after preceding steps are completed looks like this
- Step 6 – adjust openDatabase call
Modify your openDatabase call in your application including createFromLocation param. In case you named your database report in step 2 ‘testDB’ the openDatabase call should seem like something like this:...
1.SQLite.openDatabase({name : "testDB", createFromLocation : 1}, okCallback,errorCallback);
// default - if your folder is called www and data file is named the same as the dbName - testDB in this example
2.SQLite.openDatabase({name : "testDB", createFromLocation : "~data/mydbfile.sqlite"}, okCallback,errorCallback);
// if your folder is called data rather than www or your filename does not match the name of the db
3.SQLite.openDatabase({name : "testDB", createFromLocation : "/data/mydbfile.sqlite"}, okCallback,errorCallback);
// if your folder is not in app bundle but in app sandbox i.e. downloaded from some remote location.
...
Opening a database
warning: the default location on iOS has changed in model 3.0.0 – it is now a no-sync location as mandated by Apple so the release is backward incompatible.
To open a database in default no-sync place (affects iOS only)::
SQLite.openDatabase({name: 'my.db', location: 'default'}, successcb, errorcb);
To specify a different location (affects iOS only):
SQLite.openDatabase({name: 'my.db', location: 'Library'}, successcb, errorcb);
in which the location choice can be set to one of the following picks:
- default: Library/LocalDatabase subdirectory – no longer seen to iTunes and no longer subsidized up with the aid of iCloud
- Library: Library subdirectory – backed up with the aid of iCloud, now not visible to iTunes
- documents: documents subdirectory – visible to iTunes and backed up by means of iCloud
- Shared: app institution’s shared field – see subsequent section
- The unique webSql fashion openDatabase still works and the region will implicitly default to ‘default’ choice:
SQLite.openDatabase("myDatabase.db", "1.0", "Demo", -1);
Knowledge of .NET is quite rewarding in the IT industry. If you have got some skills in the .NET framework then a .NET certification from StudySection can prove to be a good attachment with your resume. You can go for a foundation level certificate as well as an advanced level certificate in the .NET framework.


