
Introduction
Sometimes, we need to take a screenshot of any particular element of the document like any div, span, or might be full body. In that case, we can simply do so by using the html2canvas library of the javascript.
Example to demonstrate
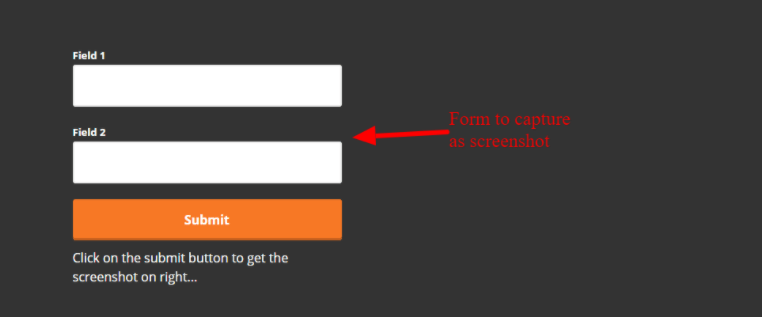
Suppose there is a form with two fields – field 1 and field 2. On submitting the form, we need to show the screenshot of the form to the right space of the form and also send an email to the admin with the screenshot of the form attached along with the field data. Below is the form before the screenshot:
Now we need to get the html2canvas library js file from the link https://html2canvas.hertzen.com/dist/html2canvas.js and save it to the js files folder of our project like we have a js-files folder here. After saving the project in the js-files directory, we need to include it to our HTML file in order to get the screenshot.
Below is the HTML of the form
<head>

	<script src="js-files/html2canvas.js" type="text/javascript"></script>

<script src="js-files/screenshot_save_submit.js" type="text/javascript"></script>

</head>

<body>

	<div class='form_outer_div'>

<form onsubmit="return submit_after_screenshot();" method="POST" id="contact_ad_form">

<input type="hidden" id="screenshot_image" name="screenshot_image">

		<div class="form-group">

			<label>Field 1</label>

			<input type="text" name="field_1" class="pix_text">

		</div>

		<div class="form-group">

			<label>Field 2</label>

			<input type="text" name="field_2" class="pix_text">

		</div>

		<span class="send_btn">

			<button type="submit" class="submit_btn" id="submit_ad_form">

				<span class="editContent" style="">Submit</span>

			</button>

</span>

		<span class="send_btn">

			Click on the submit button to get the screenshot on right...

		</span>

</form>

 </div>

<div class="ten columns omega">

<div id="screenshot"></div>	/**Div to show the screenshot**/

	</div>

</body>
Here, the file screenshot_save_submit.js (included in the header), is the file that we have created to add our script that will capture the screenshot and submit the form.
Then we created a form with id ‘contact_ad_form’ having 2 fields.
Now, on submit of this form, we need to first get the screenshot and then show it to the right before sending it to the back-end for email purposes. Therefore we will add a function to the screenshot_save_submit.js file and will call this function on the “onsubmit” event of the above form.
Below is the script for screenshot_save_submit.js
function submit_after_screenshot(){

	html2canvas(document.getElementById('form_outer_div'),{

		background :'#000000',

	}).then(canvas => {

		var imageData = canvas.toDataURL();

		document.getElementById('screenshot').appendChild(canvas);

		document.getElementById("screenshot_image").setAttribute("value", imageData);

		$.ajax({

			type: 'POST',

			url: 'contact_form_submit.php',

			data: $( "#contact_ad_form" ).serialize(),

			success: function (result) {

				console.log('Form submitted');

			},

			error: function (result) {

				console.log('Error Result --- '+JSON.stringify(result));

			}

		});

	});

	return false;

}
Here, in this function, we are calling the html2canvas() method of the html2canvas javascript library. document.getElementById(‘form_outer_div’) is fetching the div with id ‘form_outer_div’ which we are going to capture for a screenshot. In the second argument of the function, we are specifying the background color of the image to black. We can add more properties to the second argument to make the screenshot more specific like;
{
background : ‘#000000’,
height: 300,
width: 500
}
we can specify height, width, and many more properties in a similar way.
In form_submit.php
<?php

$field_1 = $_POST['field_1'];

	$field_2 = $_POST['field_2'];

/******MAIL FORMATION*********/

	$headers = "MIME-Version: 1.0\r\n";

	$headers .= "Content-Type: text/html; charset=ISO-8859-1\r\n";

	$message = '<html><body>';

	$message .= '<h3>Here are your form entries:</h3>';

	$message .= '<table border="0">';

	$message .= '<tr><th>Field 1</th><td>'.$field_1.'</td></tr>';

	$message .= '<tr><th>Field 2</th><td>'.$field_2.'</td></tr></table>';

	$file = md5(uniqid()) . '.png';	//creating unique filename for screenshot

	if(isset($_POST['screenshot_image']))

	{

		$data = $_POST['screenshot_image'];

		$uri =  substr($data,strpos($data,",")+1);

		/*****adding images to /images/screenshots folder in order to retrieve later*****/

		file_put_contents('./images/screenshots/'.$file,base64_decode($uri));

		/********attaching screenshot to mail body****************/

		$message .= '<br/><img src="cid:logo_2u" style="max-width:800px"/>';			}
$message .= '</body></html>';
/*****************include your php mailer path***************/
require(getcwd()."/pix_mail/phpmailer/PHPMailer.php");
require(getcwd()."/pix_mail/phpmailer/SMTP.php");
$mail = new PHPMailer\PHPMailer\PHPMailer();
$mail->setFrom('info_admin@gmail.com', 'Info');
$mail->addAddress(‘admin_email@gmail.com', 'Admin');
$mail->Subject = 'Form Submission';
$mail->Body = $message;
$mail->AddEmbeddedImage(getcwd().'/images/screenshots/'.$file, 'logo_2u');
$mail->isHTML(true);
if(!$mail->send()) {
error_log( 'Message was not sent.',0);
error_log('Mailer error: ' . $mail->ErrorInfo,0);
} else {
error_log('Message has been sent.',0);
}
return true;
?>
Here, we are fetching the field values then creating the HTML for the email and embedding the captured screenshot to the email.
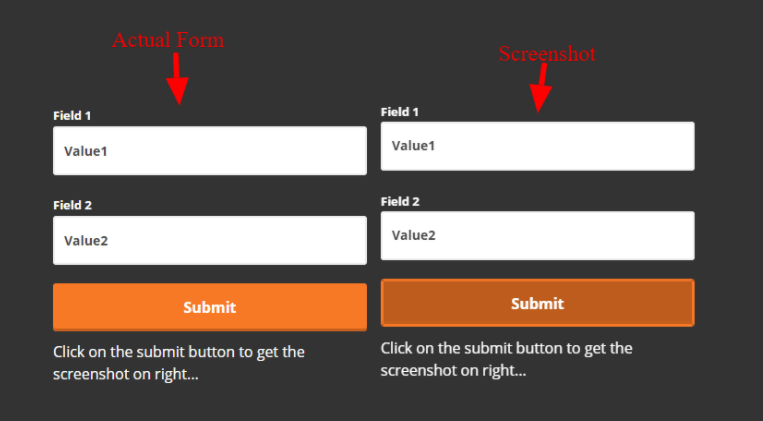
The below image is showing the actual form on the left side which was submitted to capture the screenshot and showing the captured screenshot on the right side.
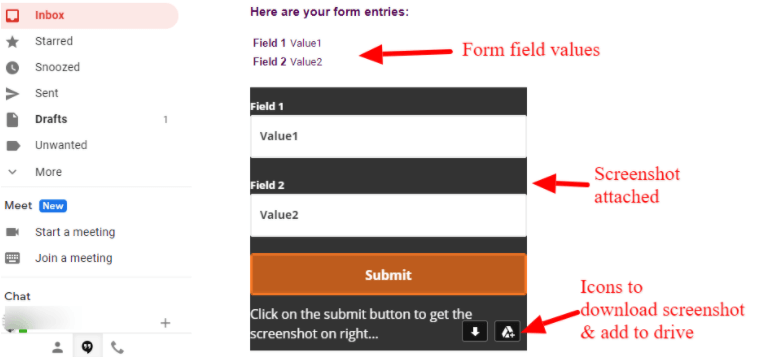
The below image is showing the email received containing the form data and the attached screenshot that can be downloaded and added to drive.
A Windows 10 certification can help you prove your skills in the Microsoft Windows 10 operating system and it can improve your chances of getting hired. StudySection offers a Windows 10 certification exam for beginner level as well as professional level individuals in the Microsoft Windows 10 operating system.


