-
Prerequisites
Before you begin, perform the following tasks:
- Verify your email address with Amazon SES—Before you can send an email with Amazon SES, you must verify that you own the sender’s email address. If your account is still in the Amazon SES sandbox, you must also verify the recipient’s email address. The easiest way to verify email addresses is by using the Amazon SES console.
- Get your AWS credentials—You need an AWS access key ID and AWS secret access key to access Amazon SES using an SDK. You can find your credentials by using the Security Credentials page of the AWS Management Console. For more information about credentials, see Types of Amazon SES credentials.
- Install Python—Python is available at https://www.python.org/downloads/. After you install Python, add the path to Python in your environment variables so that you can run Python from any command prompt.
- Install the AWSCLI module for Python (Boto3)—For download the module command is:
PIP INSTALL AWSCLI. - Add These Credentials—For adding these open the cmd in your pc then follow these commands:
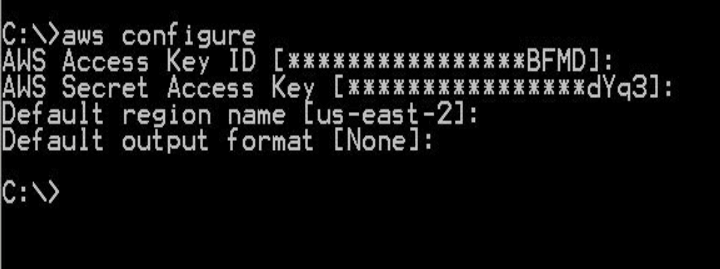
- In the above example, it is necessary to fill the AWS Access Key and Secret Access Key and others are optional like region and output format.
-
Procedure for Amazon SES email through Python
The following procedure shows how to send an email through Amazon SES.
To send an email through Amazon SES In a text editor, create a file named amazon-ses-sample.py. Paste the following code into the file:
Python program
import boto3

from botocore.exceptions import ClientError

import random

#Replace sender@example.com with your "From" address.

# This address must be verified with Amazon SES.

SENDER = “service@hellodomain.com”

# Replace recipient@example.com with a "To" address. If your account

# is still in the sandbox, this address must be verified.

RECIPIENT = “user@hellodomain.com”

# # Specify a configuration set. If you do not want to use a configuration

# # set, comment the following variable, and the

# # ConfigurationSetName=CONFIGURATION_SET argument below.

# CONFIGURATION_SET = "ConfigSet"

# If necessary, replace us-west-2 with the AWS Region you're using for Amazon SES.

AWS_REGION = "us-east-2"

# The subject line for the email.

SUBJECT = “WinsurTech Support Team”

Otp=random.randint(100000,999999)

# The email body for recipients with non-HTML email clients.

# BODY_TEXT = ("Amazon SES Test (Python)\r\n"

#             "This email was sent with Amazon SES using the "

#             "AWS SDK for Python (Boto). text part"

#             )

# The HTML body of the email.

BODY_HTML = """<html>

<head></head>

<body>

<h1>"""+SUBJECT+"""</h1>

<p> Otp for your account verification is """+str(otp)+""" .<br> <br>

Thanks, <br>

WinsurTech Support Team <br>

service@hellodomain.com <br>

</p>

</body>

</html>

"""

 # The character encoding for the email.

CHARSET = "UTF-8"

# Create a new SES resource and specify a region.

client = boto3.client('ses',region_name=AWS_REGION)

# Try to send the email.

try:

#Provide the contents of the email.

response = client.send_email(

 Destination={

'ToAddresses': [

RECIPIENT,

],

 },

Message={

'Body': {

'Html': {

'Charset': CHARSET,

'Data': BODY_HTML,

},

'Text': {

'Charset': CHARSET,

'Data': "",

},

},

'Subject': {

'Charset': CHARSET,

'Data': SUBJECT,

},

},

Source=SENDER,

# # If you are not using a configuration set, comment or delete the

# # following line

# ConfigurationSetName=CONFIGURATION_SET,

)

# Display an error if something goes wrong.

except ClientError as e:

print(e.response['Error']['Message'])

   else:

print("Email sent! Message ID:"),

print(response['MessageId']) - service@hellodomain.com— Replace with an email address that you have verified with Amazon SES. For more information, Email addresses in Amazon SES are case-sensitive. Make sure that the address you enter is exactly the same as the one you verified.
- user@hellodomain.com— Replace with the address of the recipient. If your account is still in the sandbox, you must verify this address before you use it. Make sure that the address you enter is exactly the same as the one you verified.
- (Optional) us-east-2— If you want to use Amazon SES in a region other than US West (Oregon), replace this with the region you want to use.
- Save amazon-ses-sample.py.
- To run the program, open a command prompt in the same directory as amazon-ses-sample.py, and then type python amazon-ses-sample.py
- Review the output. If the email was successfully sent, the console displays “Email sent!” Otherwise, it displays an error message.
- Sign in to the email client of the recipient’s address. You will find the message that you sent.
If you need to prove your skills in the .NET framework, get .NET certified on StudySection. StudySection provides .NET Certification Exam for beginners as well as experts in the .NET framework. This .NET certification can improve your resume’s success rate.


